El Sanchimoto
Jeep Owner
I always wanted to get this posted up because I had to do it twice (wrong tube size) and ask a lot of questions along the way. I ended up doing this years ago now and have never had a problem with the lines I extended, but I also don't have lots of water just laying around here in SoCal.
What you need:
• 20 feet of 5/16 inch INSIDE DIAMETER fuel line tubing.
• 4 hose clamps to replace OEM squeeze clamps.
• utility knife
• outdoor black plastic zip ties
• phillips screw driver
• plier
• work gloves
When I start researching this I someone posted to "get 1/4 inch ID tubing" well maybe that worked for older 3.8L JKs (I don't know) but reusing the OEM breather caps was pretty much impossible until I got 5/16". I also initially bought closer to 30 feet of tubing thinking "It's better to have extra since I don't know where the lines will be run yet". You won't need 30 unless you're doing some high-water install, in which case you probably wouldn't need to read this anyway.
Above I noted only diff and t-case breathers, not the transmission. Why is this? Long story short it appears that on my 2015 3.6L (I would presume all years) Auto JKUR there are no physical lines leaving the bell housing. I had heard from a CDJR mechanic that he thought the breather line was incorporated into the trans fluid dipstick tube. Never having full ascertained this I asked our own experts in their forum and Cloaked Willys said that this seemed possible. So I did not touch this aspect.
Transfer case breather:
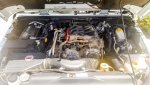
While researching how to do this line initially I saw that it came out on the top of the transfer case and terminated on the topside of the transmission bell. Again perhaps in a previous year/on the 3.8L this was true but on my 2015 3.6L the transfer case breather has been relocated to on top of the engine underneath the plastic cover. I suggest looking at the top of your engine and verifying if yours is there too.
I decided not to touch this as it was sufficient for my needs.
Axle Breathers:
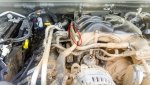
Front differential breather.
The stock breather runs up the driver side shock tower and ends just above the clip.
I reused the clip but ran mine further up into the engine bay (avoiding any heat sources) and ran it to the back nestled in a "natural high point" along the firewall.
I ran my breathers from the end point back to the pumpkins to make sure I was going to have enough slack to accomodate droop while off-roading. You don't want to pop a breather line out!
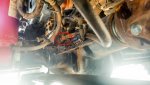
The front diff breather nipple is accessible from the drivers side at the top of pumpkin. It was a little tight getting my hands and pliers in there to get the hose clamp off but it doesn't take long.
Rear differential breather.
The rear took a little bit longer to find the best route to run it.
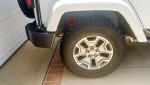
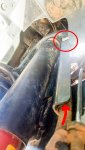
The stock location of the rear breather is on top of the frame found in the rear passenger wheel well.
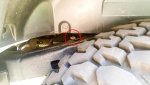
Here you can see the hose clip where the breather line used to terminate.

Again I started where the line terminated, tucked in the engine bay along the fire wall and worked my way backwards. I recommend doing this part when the engine is not hot. This side took a little more finagling to get it to stay in the correct (and safe) places. I found a couple places to tuck it and run it behind or between until I got it out of the engine bay.
I ended up running it along between the body and the frame and have had no issues with it where I ran it.
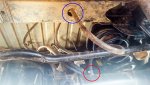
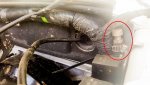
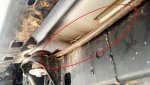
Once I got to the back I dropped it through this cross member (circled in blue) where the original line went. Then I made sure to again have enough slack in the line to accommodate droop off-road. I can only attach 10 files, luckily you can see the rear diff nipple sitting on top of the axle housing on the passenger side.
I didn't mention the use of zip ties. That is up to you to determine the best places along the breather route where you want to place them. I don't recommend not using zip ties because you don't want the slack in the line to shift slowly over time to the wrong place, especially in the engine bay. I had a couple different sizes on hand but I ended up only using the ones that were around 6 inches long and trimming the pulled ends once tightened.
If anyone has anything to add or correct please let me know! Hopefully someone finds this helpful.
What you need:
• 20 feet of 5/16 inch INSIDE DIAMETER fuel line tubing.
• 4 hose clamps to replace OEM squeeze clamps.
• utility knife
• outdoor black plastic zip ties
• phillips screw driver
• plier
• work gloves
When I start researching this I someone posted to "get 1/4 inch ID tubing" well maybe that worked for older 3.8L JKs (I don't know) but reusing the OEM breather caps was pretty much impossible until I got 5/16". I also initially bought closer to 30 feet of tubing thinking "It's better to have extra since I don't know where the lines will be run yet". You won't need 30 unless you're doing some high-water install, in which case you probably wouldn't need to read this anyway.
Above I noted only diff and t-case breathers, not the transmission. Why is this? Long story short it appears that on my 2015 3.6L (I would presume all years) Auto JKUR there are no physical lines leaving the bell housing. I had heard from a CDJR mechanic that he thought the breather line was incorporated into the trans fluid dipstick tube. Never having full ascertained this I asked our own experts in their forum and Cloaked Willys said that this seemed possible. So I did not touch this aspect.
Transfer case breather:
While researching how to do this line initially I saw that it came out on the top of the transfer case and terminated on the topside of the transmission bell. Again perhaps in a previous year/on the 3.8L this was true but on my 2015 3.6L the transfer case breather has been relocated to on top of the engine underneath the plastic cover. I suggest looking at the top of your engine and verifying if yours is there too.
I decided not to touch this as it was sufficient for my needs.
Axle Breathers:
Front differential breather.
The stock breather runs up the driver side shock tower and ends just above the clip.
I reused the clip but ran mine further up into the engine bay (avoiding any heat sources) and ran it to the back nestled in a "natural high point" along the firewall.
I ran my breathers from the end point back to the pumpkins to make sure I was going to have enough slack to accomodate droop while off-roading. You don't want to pop a breather line out!
The front diff breather nipple is accessible from the drivers side at the top of pumpkin. It was a little tight getting my hands and pliers in there to get the hose clamp off but it doesn't take long.
Rear differential breather.
The rear took a little bit longer to find the best route to run it.
The stock location of the rear breather is on top of the frame found in the rear passenger wheel well.
Here you can see the hose clip where the breather line used to terminate.
Again I started where the line terminated, tucked in the engine bay along the fire wall and worked my way backwards. I recommend doing this part when the engine is not hot. This side took a little more finagling to get it to stay in the correct (and safe) places. I found a couple places to tuck it and run it behind or between until I got it out of the engine bay.
I ended up running it along between the body and the frame and have had no issues with it where I ran it.
Once I got to the back I dropped it through this cross member (circled in blue) where the original line went. Then I made sure to again have enough slack in the line to accommodate droop off-road. I can only attach 10 files, luckily you can see the rear diff nipple sitting on top of the axle housing on the passenger side.
I didn't mention the use of zip ties. That is up to you to determine the best places along the breather route where you want to place them. I don't recommend not using zip ties because you don't want the slack in the line to shift slowly over time to the wrong place, especially in the engine bay. I had a couple different sizes on hand but I ended up only using the ones that were around 6 inches long and trimming the pulled ends once tightened.
If anyone has anything to add or correct please let me know! Hopefully someone finds this helpful.
Last edited: